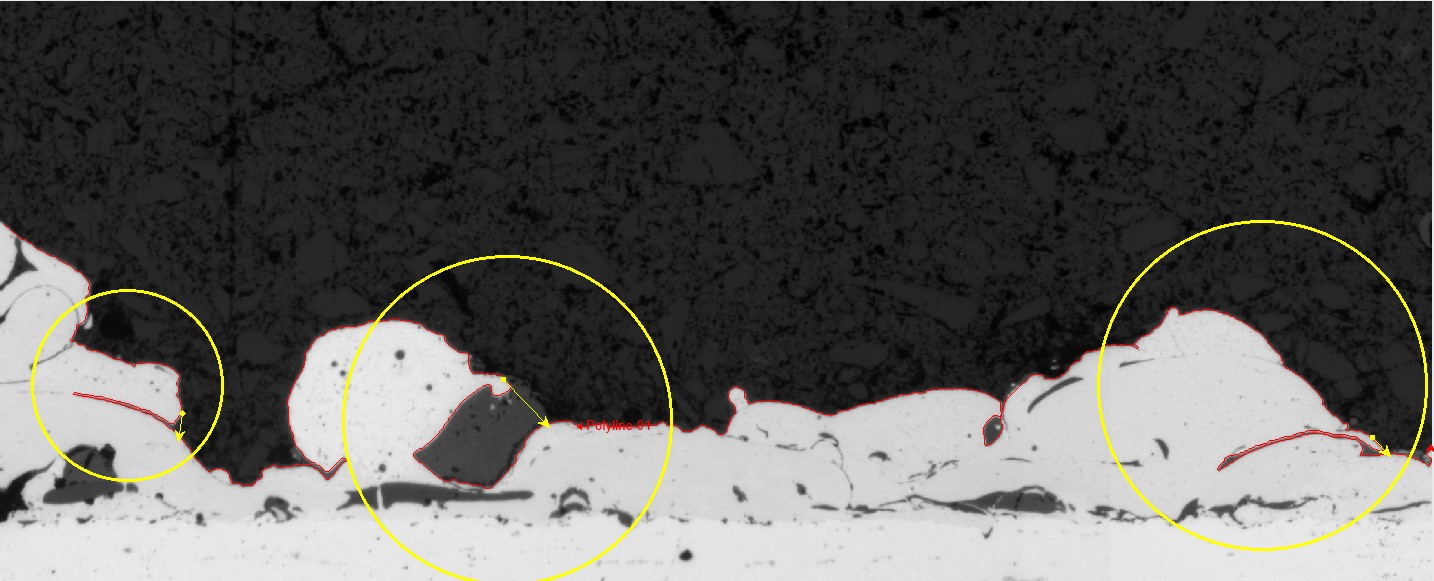
Break and connect a polyline to avoid undercuts
Hello,
May I know if it is possible to break and connect a polyline? Please see the attached image for example. Red line is a polyline. The circles indicate a few location where I would like to break the line and connect with the line as indicated with the arrow.
Man thanks,
Paulstar008
May I know if it is possible to break and connect a polyline? Please see the attached image for example. Red line is a polyline.
 The circles indicate a few location where I would like to break the line and connect with the line as indicated with the arrow.
Man thanks,
Paulstar008
0
Best Answer
-
Ok, then on the screenshot below you can see tooltip with all the combinations of keys you can use creating an auto-trace:

You can set lower tracing Speed and stop/resume tracing (Space key) in manual/automatic modes avoiding going into the cracks.
You can also use smart segmentation with smoothing channels (e.g. Low Pass Erode) to segment your material without gaps:
Yuri
0
Answers
-
Hi Paulstar008,
How do you create that polyline?
If you create it with Auto-Trace, then you can manually edit it when you create it (check the text in the status bar that shows different ways to stop/resume/undo/edit polyline). Auto-trace panel has numerous parameters that can control the trace.
If you draw it manually (even with auto-trace), you can edit it later using Nudge tool (select the line, right mouse click, Nudge tool from the context menu).
If you segment areas, then you can later remove the narrow gaps using the "Morpho close" tool on the Measure tab (relative group).
There are other ways to remove or link gaps using smart segmentation selecting proper channels.
Yuri0 -
Hello Yuri,
Many thanks for your quick response. The line is created using "Auto Tracing Polyline" in "Line Profile"
Best regards,
Paulstar0080 -
Hello,
Many thanks Yuri. Auto tracing at reduced speed works just fine for me.
Best regards,
Paulstar0080 -
2021-07-12-164418Paulstar008 --Here is another option that you might consider.In the image below, a section of an image of a white comb was duplicate in an image file. The comb on the left is the original comb. The comb on the right was edited so that the first gap would not be followed by the THRESHOLD and COUNT.
 The EDIT was done using the ANNOTATE TOOL. This is shown below. The ANNOTATE LINE TOOL was used to create a WHITE LINE from across the GAP.
 The BURN IN ANNOTATION TOOL was used to change the IMAGE.
 If you do a number of these, the DEFAULT CONFIGURATION for the ANNOTATION LINE TOOL can be set to a configuration that works well for your parts and your measurements.I hope this information is helpful.-- Matt
0 -
Dear Matt,
Thank you. This is also an approach that would work for me.
Best regards,
Paulstar0080 -
2021-07-13-132724Paulstar008 --Super.I am glad that this method gives you an option.Remember to keep a copy of your original image!Good luck.-- Matt
0
Categories
- All Categories
- 958 Image-Pro v9 and higher
- 9 Image-Pro FAQs
- 18 Image-Pro Download & Install
- 444 Image-Pro General Discussions
- 487 Image-Pro Automation (Macros, Apps, Reports)
- 20 AutoQuant Deconvolution
- 2 AutoQuant Download & Install
- 18 AutoQuant General Discussions
- 193 Image-Pro Plus v7 and lower
- 3 Image-Pro Plus Download & Install
- 105 Image-Pro Plus General Discussions
- 85 Image-Pro Plus Automation with Macros
- 35 Legacy Products
- 15 Image-Pro Premier 3D General Discussions
- 20 Image-Pro Insight General Discussions

